What Is an Art Hanging System?
An art hanging system uses rails, cables, and adjustable hooks instead of traditional nails or picture hooks. A single rail mounts near ceiling height, supporting hanging cables that drop to adjustable hooks holding your frames. It eliminates wall damage whilst providing complete flexibility to rearrange artwork whenever inspiration strikes.
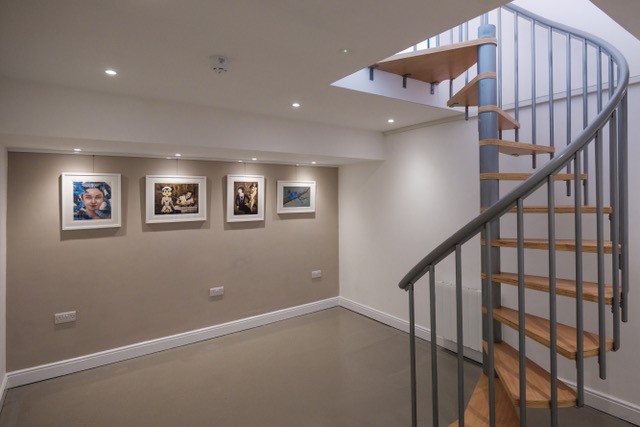
Gallery walls benefit enormously from these picture hanging solutions, as modern art hanging systems encourage the trial-and-error process that produces genuinely interesting displays.
Step 1: Plan Your Gallery Wall Layout
Begin with paper templates cut to your frame sizes. Arrange these on the floor or tape them to the wall using removable adhesive. This physical mockup reveals spacing issues and compositional problems before any installation happens.
Consider visual weight distribution. Large dark frames dominate. Delicate watercolours recede. Balance heavy pieces across your composition rather than clustering them. Vary frame sizes and orientations for visual interest whilst maintaining overall cohesion through colour palette or mat board choices.
Photograph successful arrangements before dismantling your templates, and use these images to guide installation and provide reference if you need to recreate positions during hanging.
Step 2: Choose the Right Art Hanging System
Rail options vary by mounting method and profile. Ceiling-mounted systems sit flush against ceilings or cornices. Wall-mounted versions attach slightly below ceiling height. Slimline profiles nearly disappear whilst standard tracks offer higher weight capacity.
Cable selection depends on your artwork weights. Clear nylon cables handle lighter pieces invisibly. Stainless steel cables in silver, white, or black support heavier frames whilst complementing different interior schemes. Calculate total weight for all pieces to ensure adequate capacity.
Hook styles affect both function and aesthetics. Push-button hooks adjust tool-free, perfect for frequent rearrangement. Mini hooks offer slimmer profiles for minimalist displays. Verify weight ratings match your heaviest pieces.
Step 3: Install the Rail Securely
Measure wall width precisely, accounting for end caps if not running rail along entire walls. Mark drilling positions every metre plus one at each end. Straight installation matters enormously since crooked rails become obvious once artwork hangs.
Wall type determines appropriate fixings. Solid walls require standard plugs and screws. Plasterboard needs proper cavity anchors rated for expected loads. Locate ceiling joists for ceiling-mounted systems, using stud finders to ensure secure attachment points.
Level checking throughout installation prevents disappointment. A perfectly level rail looks professional. Even slight deviations become glaring once multiple pieces hang from it.
Step 4: Hang the Cords and Hooks
Insert cables along the rail according to your planned layout. Most systems allow cable insertion anywhere along rail length rather than restricting placement to rail ends. This flexibility proves invaluable when spacing pieces precisely.
Attach two cables per frame for pieces over 50cm wide or anything particularly heavy. Space cables roughly two-thirds of frame width apart for optimal balance and to prevent tilting.
Position hooks at appropriate heights for each piece. Remember that hook positions determine frame tops, not centres. Account for varying frame heights when planning vertical alignment across your gallery wall.
Step 5: Arrange and Adjust Your Artwork
Hang pieces according to your template plan, but remain flexible. What worked on paper might need adjustment in three dimensions. Trust your eye over rigid adherence to initial layouts.
Start with anchor pieces first – typically your largest or most important frames. Build around these focal points, adding smaller pieces until composition feels balanced. Step back frequently to assess overall impact from viewing distances.
Fine-tune spacing and alignment using the system’s adjustment capabilities. Slide cables horizontally. Adjust hook heights vertically. This refinement phase separates adequate gallery walls from exceptional ones.
Step 6: Add Final Touches
Ensure all pieces hang level individually even whilst creating interesting overall compositions. Small adjustments to hanging wire positions on frame backs correct minor tilting.
Tidy excess cable behind frames. Most cables coil neatly, hiding behind artwork. This attention to detail maintains the professional aesthetic that makes gallery walls impressive.
Consider lighting if pieces seem lost or colours appear muted. Picture lights or adjustable spotlights highlight specific pieces whilst adding depth to your display.
Why an Art Hanging System Is Worth It
Gallery walls evolve. Your tastes change. New pieces arrive. Children outgrow certain artwork. Traditional hanging makes these realities feel burdensome because each rearrangement means new damage.
Art hanging systems transform uncertainty into opportunity. Experiment freely with different arrangements. Rotate pieces seasonally. Replace that graduation photo without guilt or effort. The initial investment in proper picture hanging solutions pays dividends through years of damage-free flexibility.
Professional galleries use these systems because they work. Homeowners adopt them for the same reasons: superior results, genuine flexibility, wall protection, and clean aesthetics that focus attention on artwork rather than mounting hardware.
Final Thoughts
Creating a gallery wall using an art hanging system requires planning and patience, but the results justify the effort. The combination of professional installation quality and ongoing flexibility makes these systems superior to traditional approaches. Your walls stay pristine. Your displays evolve with your life. The artwork receives the presentation it deserves.
Conclusion
Gallery walls transform blank walls into curated displays reflecting your personality and interests. Art hanging systems make this transformation achievable without commitment or damage. Whether creating your first gallery wall or enhancing existing displays, these modern picture hanging solutions provide the infrastructure for genuinely impressive results. Contact The Gallery System UK to explore options suited to your space and discover how professional-grade hanging systems make stunning displays accessible for every home.